UV DTF transfer has emerged as a powerful method for decorating fabrics with full-color, photo-realistic designs. Whether you’re applying UV DTF transfer on shirts or UV DTF transfer on hoodies, the technique delivers vibrant, durable results. This step-by-step approach covers how to apply UV DTF, from design prep to pressing and post-care. You’ll also compare UV DTF vs traditional DTF to choose the best option for your projects and fabrics. Finally, learning care and maintenance for UV DTF prints helps keep colors vibrant through many washes.
Beyond the name, this approach relies on UV-curable inks printed onto a film and then transferred to fabric, enabling sharp details and broad fabric compatibility. Think of it as a film-based garment-decoration method that combines digital design flexibility with a durable, finished feel comparable to traditional printing techniques. LSI-style language looks at related concepts such as UV-curable film decoration, direct-to-film workflows, and heat-press-ready transfers when evaluating color accuracy and longevity across cotton, blends, and synthetics. As you plan projects for shirts or hoodies, consider on-demand production, quick turnarounds, and consistency of results alongside cost efficiency.
What Is UV DTF Transfer and Why It Matters for Apparel
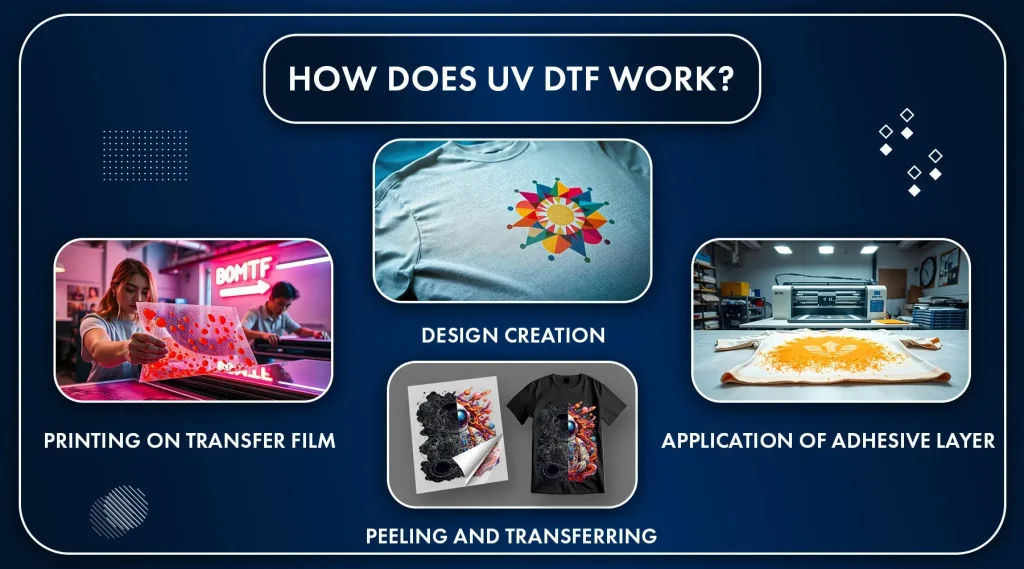
UV DTF transfer is a garment decoration method that uses UV-curable inks printed onto a specialized DTF film. The design is then bonded to fabric through a heat-press process, activating an adhesive powder that holds the image in place. The result is a full-color, photo-realistic print with sharp details and excellent color depth. Compared with traditional printing methods like screen printing or vinyl transfers, UV DTF offers crisper gradients, better handling of fine lines, and a workflow that suits small runs and on-demand production.
This technique works across a wide range of fabrics, including shirts and hoodies, as well as blends that might challenge other methods. The ability to reproduce photographic imagery with consistent color makes UV DTF transfer particularly attractive for apparel designers who want vibrant artwork on both light and dark fabrics. When you plan a project, consider your target garment and how UV DTF transfer aligns with your design intent, whether you’re printing on shirts or hoodies. Compared with UV DTF vs traditional DTF, you’ll notice differences in drying behavior, texture, and feel that can influence your final choice.
UV DTF Transfer on Shirts: Design Prep and Base Layers
Design prep for UV DTF transfer on shirts centers on high-resolution artwork and precise color management. Use vector elements for sharp edges and gradients that stay crisp when scaled. If you plan to print on dark shirts, include a suitable white or light base layer in the design plan to maintain brightness after transfer. Always save your artwork with embedded color profiles and follow your printer’s required formats to ensure predictable results.
Before committing to a full run, perform a low-cost test print on a similar fabric to verify color balance, edge detail, and alignment. Check print quality for vibrancy and ensure there are no banding issues or misregistration. Prepare a garment mockup to confirm placement and margins, and ensure the fabric is pre-washed and lint-free to promote consistent adhesion. This careful preparation helps ensure quality UV DTF transfer on shirts and reduces the chance of surprises in larger runs.
UV DTF Transfer on Hoodies: Handling Thickness and Alignment
Hoodies bring additional considerations because they are thicker and can vary in pile and seam placement. Pre-press to remove moisture, then use appropriate pressure and longer dwell times to ensure the adhesive bonds properly. A larger platen can help cover the full transfer area without edge overhang, and heat-resistant tape helps maintain alignment. When dealing with UV DTF transfer on hoodies, factor in the fabric’s nap and fleece texture which can affect adhesion and edge sharpness.
Always test on a similar hoodie fabric—cotton, poly-blend, or fleece—to check how the print adheres and whether there is any scorching or cracking. Confirm that the powder curing step is complete and that the transfer is fully bonded before removing the garment from heat. These checks reduce the risk of lifting after wash and support durable results for UV DTF transfer on hoodies, especially in areas with seams or zippers.
How to Apply UV DTF: Step-by-Step Techniques for Shirts and Hoodies
How to apply UV DTF: start with clean, pre-pressed garments, align the UV DTF film with heat-resistant tape, and prepare the heat press settings according to your film’s guidelines. Print and cure the design on the film, apply the adhesive powder, and run any required curing steps before placing the garment on the press. Then transfer the design with even pressure and minimal movement, using the recommended temperature and time.
During the actual transfer, follow the manufacturer’s recommended temperature, typically around 160°C (320°F), and a short dwell time. Use a silicone sheet to protect both the print and fabric, and avoid sliding the film during pressing to prevent blurring. After pressing, perform a hot or warm peel as advised by your film system, and inspect the design for edge lift or misregistration. This approach outlines how to apply UV DTF and helps you optimize results on shirts and hoodies alike.
Care and Maintenance for UV DTF Prints: Durability and Washing Tips
Care and maintenance for UV DTF prints starts with proper post-press handling. To maximize durability, turn garments inside out before washing, use gentle detergents, and avoid high-heat drying during the first few cycles. Following these care steps helps preserve color vibrancy and adhesion over many washes, keeping the print looking sharp on shirts, hoodies, and other fabrics.
Additional tips include avoiding direct sunlight for extended periods, not ironing directly over the print, and storing garments in a cool, dry place. For optimal longevity, stick to mild detergents and air-dry when possible. By adhering to consistent care and maintenance for UV DTF prints, you extend the life of your transfers and maintain color fidelity across different fabrics and wear.
UV DTF vs Traditional DTF: Comparisons, Pros, Cons, and Troubleshooting
UV DTF vs traditional DTF presents a set of trade-offs. UV DTF uses UV-curable inks that dry instantly under UV exposure, delivering crisp details and high color saturation with rapid turnaround and easier on-demand production. Traditional DTF relies on water-based inks and a curing step, which can influence color behavior, texture, and the required curing time. Each method has its place depending on batch size, fabric type, and desired feel.
Common troubleshooting for UV DTF and traditional DTF includes checking alignment, ensuring consistent heat across the platen, and verifying curing of the adhesive powder. Misalignment, halos, or surface cracking can arise from improper curing, peel method, or pressing pressure. By understanding the differences and following manufacturer guidelines, you can optimize results, reduce waste, and choose the best method for your shirts, hoodies, and other textiles.
Frequently Asked Questions
How to apply UV DTF transfer on shirts?
To apply UV DTF transfer on shirts: prepare a high‑resolution design (with a white base if needed for dark fabrics), print on UV DTF film, apply adhesive powder and cure, pre‑press the garment to remove moisture, position the transfer with heat‑resistant tape, and press at about 160°C (320°F) for 12–15 seconds with even pressure. Use a hot‑peel or warm‑peel method per your film system, then inspect for full contact and edge lift. For dark fabrics, ensure a suitable underbase is used.
What should I know about UV DTF transfer on shirts vs hoodies?
UV DTF transfer on shirts and hoodies uses the same overall process, but thicker hoodies require higher pressure and sometimes a longer dwell time, while shirts often need slightly less pressure. Consider fabric type, seams, and platen size, and test on a sample first. UV inks cure instantly, and dark fabrics may need a white underbase for optimal color.
How does UV DTF transfer on hoodies affect heat‑press settings?
When applying UV DTF transfer on hoodies, use higher pressure and a marginally longer press time (around 160–165°C for 12–18 seconds) and ensure your platen covers the entire design area. Thick fabrics benefit from a thorough pre‑press and possibly a longer curing step to achieve full adhesion and avoid coating gaps.
UV DTF vs traditional DTF: which should you choose for small runs?
UV DTF vs traditional DTF: UV DTF uses UV-curable inks with instant curing, often enabling crisper details and faster turnarounds for small runs. Traditional DTF uses water‑based inks with a separate curing step. Both can produce durable results, but UV DTF may offer workflow advantages and different texture depending on fabric and film system.
Care and maintenance for UV DTF prints
Care for UV DTF prints by washing inside‑out, using mild detergents, and avoiding chlorine bleach. Air‑dry when possible or use a low heat setting if drying in a machine. Do not iron directly over the print; if needed, place a protective sheet and use low heat. Store garments away from direct sunlight to preserve color.
What are common mistakes and troubleshooting tips for UV DTF transfers?
Common issues include misalignment, inconsistent heat, and inadequate curing. To troubleshoot: verify alignment with test garments, calibrate the heat press for even temperature, ensure proper curing of the adhesive powder, avoid over‑pressing on thin fabrics, and choose the appropriate peel method (hot or cold) to prevent edge lifting or cracking.
| Key Point | Description | Notes / Examples |
|---|---|---|
| What is UV DTF transfer | A process that prints designs onto UV-curable ink on a DTF film, applies adhesive powder, cures it, and heat-presses the design onto fabric to create a full-color transfer. | Instant UV cure, high color depth, broad fabric compatibility. |
| Why use UV DTF | Delivers rich colors and gradients, works on many fabrics (cotton, blends, some poly blends), and is suitable for small runs or on-demand printing. | Great for shirts, hoodies, and varied fabrics. |
| What you need before starting | UV-capable printer or access to UV DTF film, heat press, DTF adhesive powder, curing source, transfer masks or heat tape, pre-washed garments, ventilated workspace. | Pre-wash and lint-free fabrics improve adhesion. |
| Core steps (overview) | Design & print on UV DTF film → apply and cure adhesive powder → transfer with heat press → peel & finish with aftercare. | Follow manufacturer guidelines for film and powder. |
| Step-by-step highlights | Seven steps: design, test print, print on film, apply adhesive, cure, pre-press, transfer, peel, and post-press care. | Typical temps: around 160°C and 12–15 seconds; adjust per film specs. |
| Shirts vs hoodies | Shirts: lighter fabrics require slightly less pressure/time. Hoodies: thicker fabrics require higher pressure/time. | Platen size and fabric thickness impact results. |
| Fabric compatibility | Typically works on cotton and blends; polyester blends may need adjustments; dark fabrics may require a white underbase. | Always test on sample fabrics before production. |
| UV DTF vs traditional DTF | UV DTF uses UV-curable inks that cure instantly; traditional DTF uses water-based inks with a separate curing step. | Differences in color behavior, workflow, durability feel, and cost. |
| Care & maintenance | Turn garments inside out, wash cold, use mild detergents, avoid chlorine bleach and high-heat drying, and air-dry when possible. | Proper care extends print life. |
| Troubleshooting | White halos, edge lifting, cracking on folds, or peeling after wash; adjust underbase, curing, pressure, or peel method as needed. | Always verify with test prints and alignment checks. |
| FAQs | Can UV DTF transfers be used on dark fabrics? Yes, with a white base/underbase if needed. Is there a minimum order size? No strict minimum; suitable for small runs. How to store films? Cool, dry place away from sunlight. | Follow supplier guidelines for storage and usage. |
Summary
Conclusion: UV DTF transfer offers a powerful way to create vibrant, durable designs on shirts, hoodies, and more. By understanding the steps—from design and printing to curing, transferring, and aftercare—you can achieve professional results with a streamlined workflow. The key is to follow manufacturer recommendations for your specific UV DTF film and equipment, perform test runs on target fabrics, and apply careful prepress and post-press care. Whether comparing UV DTF transfer on shirts to UV DTF on hoodies or weighing UV DTF vs traditional DTF, this approach provides a solid foundation for producing high-quality, long-lasting prints that your customers will love.