DTF gangsheet builder: A step-by-step creation guide
The DTF gangsheet builder is your essential tool for planning, arranging, and optimizing a single sheet that holds multiple designs, helping you maximize output and maintain consistent quality across transfers. By aligning with the DTF printing workflow, designers can streamline color management and reduce waste across batches. This introductory guide shows how to use a DTF gangsheet builder to turn concept art into accurate, production-ready gang sheets. Smart spacing, margins, and real-time previews help you catch layout issues before printing and ensure alignment on every garment. Following the DTF transfer guidelines will help you achieve durable, vibrant results and reliable performance in production.
Viewed through a broader lens, this planning tool functions as a multi-design layout engine for heat transfers, helping shops coordinate several graphics on a single printable sheet. Think of it as a batch-layout solution that converts standalone artwork into a coordinated production sheet, preserving margins, safe zones, and accurate scaling. Because templates can be reused and adapted, teams can accelerate setup and maintain consistency across many orders. In practice, this approach supports a scalable workflow where designers and production staff collaborate more smoothly, with clear previews guiding every decision.
DTF Printing Workflow and Gangsheet Design: How to Build a Custom Gangsheet Template
Mastering the DTF printing workflow begins with smart gangsheet design. A well-planned gangsheet template lets you pack multiple designs onto one sheet while maintaining clear margins, safe areas, and precise color management so every transfer prints crisply. By starting from a custom gangsheet template, you can standardize spacing and reuse layouts across jobs, reducing waste and ensuring consistent output quality across every transfer.
This section walks you through how to build a gangsheet from concept to print. Start by defining project scope and selecting or creating a template that matches your print bed and substrate. Gather artwork in CMYK, verify resolution, and arrange designs using alignment guides. Manage color separations and set bleed and safe zones so nothing is clipped during trimming. The result is a production-ready gangsheet that aligns with your DTF printing workflow and can be exported as print-ready files for reuse.
DTF Gangsheet Builder: From Concept to Transfer with DTF Transfer Guidelines
Using a DTF gangsheet builder puts you in control of placement, spacing, and color accuracy on a single sheet. The tool supports gangsheet design through templates, alignment guides, and color separation previews, helping you maximize sheet capacity while keeping designs aligned across multiple transfers. With a dedicated builder, you can standardize templates and workflows, speeding production and reducing setup errors across future runs.
When moving from sheet to garment, follow clear DTF transfer guidelines to ensure vibrant, durable results. Review heat, pressure, and curing times for each substrate, perform test prints, and adjust color accuracy as needed. Export print-ready formats (such as TIFF or PNG at 300 DPI or higher) and save color proofs if your workflow requires them. By adhering to these guidelines, you’ll achieve consistent transfer quality and a scalable process from concept through to finished apparel.
Frequently Asked Questions
How can a DTF gangsheet builder streamline the DTF printing workflow and improve transfer accuracy?
A DTF gangsheet builder optimizes the DTF printing workflow by letting you quickly plan layouts, reuse templates, and standardize margins, bleed, and safe areas. It provides visual previews to catch spacing or alignment issues before printing, supports color management and separations to keep colors consistent across designs, and exports print-ready files and color proofs that support reliable DTF transfer guidelines and cohesive gangsheet design.
How to build a gangsheet with a DTF gangsheet builder and create a custom gangsheet template for repeated designs?
Start by defining the project scope and selecting or creating a custom gangsheet template. Gather artwork and verify color spaces and resolution, then arrange designs with proper spacing, margins, and bleed to support clean gangsheet design. Use shared color palettes and accurate separations, preview the full sheet, and export print-ready files. Save the template for future runs to streamline your DTF printing workflow, and follow DTF transfer guidelines during production.
| Aspect | Key Points |
|---|---|
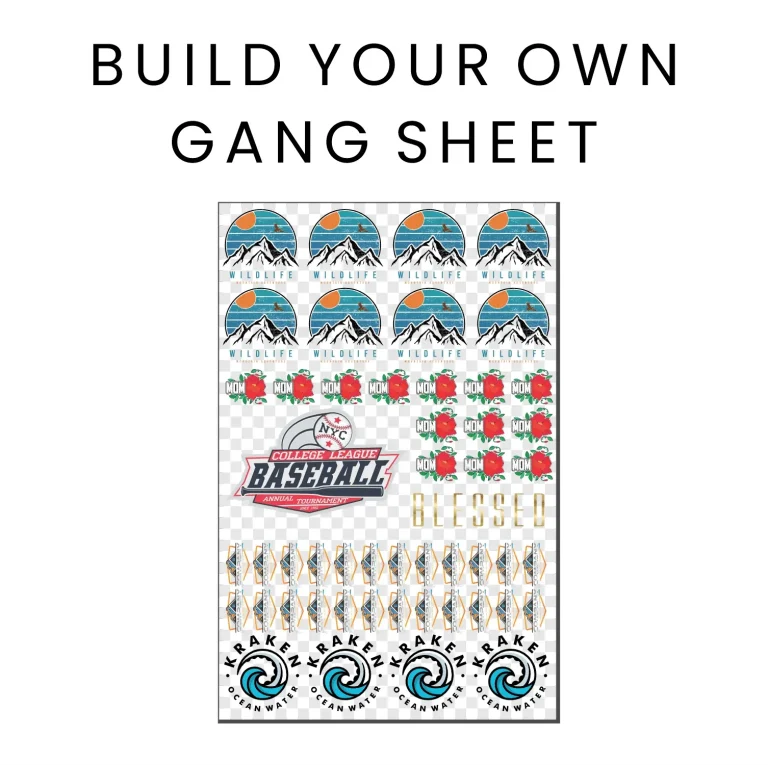
| What is a DTF gangsheet? | A compiled layout that packs several designs into one printable sheet. This lowers material cost per item and speeds up production by printing many designs in a single run before cutting and applying transfers. The key to an effective gangsheet is smart spacing, correct sizing, and precise color management for crisp prints and proper alignment. |
| Why use a DTF gangsheet builder? | Benefits include: Efficiency (plan layouts quickly and reuse templates); Consistency (standardize margins, bleed, and safe areas); Accuracy (visual previews catch spacing/alignment issues); Customization (create templates tailored to workflow and substrates). |
| Preparing for your first build | Gather artwork in high resolution CMYK; compile design dimensions (max width/height, total designs); collect printer/transfer parameters (DPI, ink type, substrate); understand the print area and color limitations. |
| Design considerations | Visual flow (group related designs); Color management (plan separations to avoid clashes); Safe areas and margins (prevent edge clipping); Printable sizes (fit print bed and maintain legibility); Design licensing (rights for all elements). |
| Step-by-step build (high-level) | Step 1: Define scope and template; Step 2: Gather artwork and verify specs; Step 3: Create the gangsheet layout; Step 4: Manage color palettes; Step 5: Add bleed and safety zones; Step 6: Preview; Step 7: Export; Step 8: Transfer guidelines; Step 9: Proof and iterate. |
| Best practices for DTF gangsheet design | Clear hierarchy (strongest designs first); Legible typography; Prefer vector shapes; License checks; Documentation (save template settings and color palettes for reuse). |
| Common mistakes to avoid | Overcrowding the sheet; Inconsistent margins; Ignoring substrate differences; Skipping color proofing. |
| Real-world tips and case study | A print shop transitioning to a DTF gangsheet builder saw 25% waste reduction and a 40% faster turnaround on typical runs. Standardizing templates reduced setup time, improved color consistency, and streamlined proofing; versatile templates accommodated a range of designs quickly. |
| Conclusion (from base content) | A DTF gangsheet builder is a powerful ally for optimizing production workflow. By following a structured, step-by-step approach, you can design efficient gang sheets with consistent margins, precise color management, and reliable transfer results. Careful planning, template reuse, and thorough proofing maximize output while preserving quality across every print run. Start by building a strong gangsheet process today and create a few custom templates that fit your most common orders; with practice, the process becomes second nature, enabling faster, cleaner, and more profitable production. |
Summary
Conclusion: A DTF gangsheet builder is a powerful ally for optimizing production workflow. By following a structured, step-by-step approach, you can design efficient gang sheets with consistent margins, precise color management, and reliable transfer results. Careful planning, template reuse, and thorough proofing helps maximize output while preserving quality across every print run. If you’re aiming to improve your DTF printing workflow, start by building a strong gangsheet process today, and consider creating a few custom gangsheet templates that fit your most common orders. With practice, the process becomes second nature, and your operation will print faster, cleaner, and more profitably.