DTF Printing for Beginners: Step-by-Step First Project
DTF Printing for Beginners invites you into a vibrant world of personalized apparel with a gentler learning curve than traditional methods. This approachable guide teaches you how to start DTF printing, outlining the essential steps, equipment, and a simple workflow. You’ll learn about the DTF transfer process and why many crafters find this method forgiving on a variety of fabrics. We’ll compare DTG vs DTF to help you choose the right approach for your fabrics and goals. Along the way, you’ll get practical tips on a reliable DTF printer setup to maintain consistency and quality.
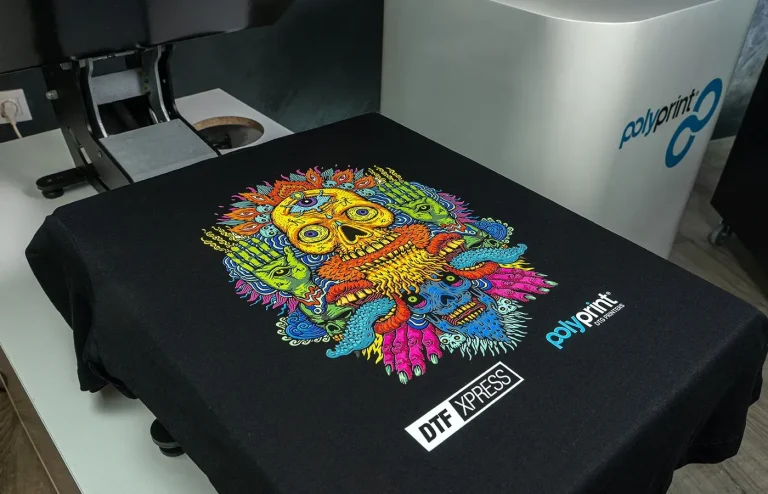
Beyond the catchphrase, this approach is best understood as direct-to-film printing, a transfer-film workflow that lets you build skills before committing to large runs. From the outset, the focus is on a repeatable process: design for the film, print with CMYK inks, apply bonding powder, cure, and press onto fabric. Viewing the method through an LSI lens, you’ll also explore related concepts such as the bonding powder’s role, film quality, and how this technique compares with traditional DTG. Whether you call it direct-to-film, transfer-on-film, or a film-based imprint method, the core ideas remain the same: control color, manage texture, and validate results on test garments.
DTF Printing for Beginners: Your Roadmap to a First Successful Transfer
DTF printing for beginners opens the door to customized apparel with a forgiving workflow. With a modest setup—a compatible DTF printer, DTF film, adhesive powder, a curing device, and a heat press—you can move from concept to a tangible first print in a weekend. Framed this way, the DTF transfer process becomes the core focus, not a single perfect artwork, making it ideal for learners who want real results early. If you’re wondering how to start DTF printing, this guide emphasizes building a repeatable routine you can rely on for every project.
Next, set up a simple, repeatable workflow that covers the end-to-end transfer: design prep, mirroring for film printing, adhesive powder application, curing, trimming, heat pressing, and final inspection. A solid approach also means nailing your DTF printer setup—cleaning print heads, selecting the right film and ink profiles, and running small test prints to dial in speed and density. If you’re asking how to start DTF printing, document each test so you can reproduce successful results and reduce waste as you build confidence through the DTF transfer process.
DTG vs DTF and the DTF Transfer Process: How to Decide Your Path
DTG vs DTF: Understanding the basics helps beginners choose the right tool for each project. DTG shines with a soft hand-feel on cotton garments, while DTF offers versatility across fabrics and colors thanks to the transfer film and adhesive powder. Start with short runs and mixed fabrics to see how each method performs in practice, and set expectations for durability and turnaround. Evaluating your goals—volume, fabric variety, and finish quality—clarifies when DTF is the smarter starting point.
When you decide to pursue DTF, focus on the DTF transfer process specifics: ensure your printer supports CMYK printing on transfer film, select compatible powder, and tune curing and heat-press parameters for each fabric. If you’re comparing routes, run controlled tests that mirror your target garments and print sizes. For those exploring how to start DTF printing in a mixed-shop environment, a solid grasp of DTF printer setup and color-management basics will make it easier to switch between DTG and DTF as demand shifts.
Frequently Asked Questions
DTF Printing for Beginners: What is the basic DTF transfer process and which steps should I master first to ensure reliable results?
DTF printing for beginners begins with understanding the transfer process: design prep, printing on DTF film with CMYK inks, applying adhesive powder, curing the film, and transferring it to fabric with heat. For reliable results, focus on a repeatable workflow: verify film and ink compatibility, mirror artwork for printing, and run small test prints to dial in color and timing. Set up a beginner-friendly kit—DTF printer, DTF film, adhesive powder, a curing device, and a heat press—and keep your workspace organized. As you gain experience, document your settings for different fabrics so you can reproduce quality prints consistently.
DTG vs DTF: As a beginner, how to start DTF printing and decide whether DTF or DTG is the right fit for your goals?
DTG vs DTF: For a beginner, DTF printing tends to offer versatile results across a range of fabrics and a simpler setup for short runs, while DTG can deliver a very soft hand on cotton. If you’re deciding which path to take, many beginners find starting with DTF printing a forgiving entry point for learning color management and transfer consistency. To begin DTF printing, define your goals, assemble a basic setup (DTF printer, film, adhesive powder, curing device, heat press), and run small test prints. Calibrate color profiles, mirror artwork as needed, and document your workflow so you can reproduce successful results and compare to DTG later.
| Aspect | Description |
|---|---|
| What is DTF? | Direct-to-film printing involves printing a design on a special film using CMYK inks, applying a bonding powder, curing, and transferring the finished film to fabric with heat. It differs from DTG by using a transfer film and adhesive powder, which can improve color reproduction and durability across a wider range of fabrics. |
| Beginner-friendly appeal | DTF offers flexibility to print on cotton, blends, and some synthetics, supports short runs and personalized orders, and is forgiving for newcomers compared with some other methods. |
| Core workflow | The core idea is a repeatable sequence: prepare design, print on film, apply adhesive powder, cure, trim, transfer with heat, peel and finish. |
| Key terms | DTF film, CMYK inks, adhesive powder, curing device, heat press, and RIP/color-management software define the essential toolkit. |
| Equipment & setup | A beginner setup typically includes a DTF printer, DTF film, adhesive powder, a curing device, a heat press, a dependable workstation, lint-free textiles, and color/ RIP software. |
| Design & color management | Create mirrored designs for printing, calibrate color with profiles for film and ink, and run test swatches to align on the target fabric. |
| Printer setup tips | Use the correct film and ink, perform nozzle checks, install appropriate profiles, and experiment with one-changing-parameter test charts to dial in print quality. |
| Transfer process steps | 1) Prepare design 2) Print on film 3) Apply adhesive powder 4) Cure the film 5) Trim/align 6) Transfer with heat 7) Peel/finish. |
| Common beginner tips | Maintain a simple, repeatable workflow; label profiles; keep a clean workspace; regularly maintain the printer (head cleaning, film/powder checks) and run test pulls. |
| DTG vs DTF | DTG offers a soft hand-feel on cotton; DTF provides broader fabric compatibility, easier color layering, and robust durability for diverse textiles—useful for beginners exploring different garments and short runs. |
| Scaling & growth | DTF supports moving from a single prototype to small batches with a repeatable process and ongoing optimization. |